"Will It Require A New
Concrete Garage Floor
To Make Your Garage Serviceable?"

If your existing concrete garage floor is so cracked and settled that mud jacking and additional concrete repair or concrete restoration would be out of the question, then your only alternative is to tear-out the old garage floor, along with the poorly prepared subsoils beneath it, and start fresh.
There is no special way to accomplish the tear-out project although we recommend you rent a small jackhammer and break the old garage floor into the smallest pieces possible. It saves your back from sledge-hammering the failed floor and carrying larger and heavier pieces of concrete for disposal.
Preparations
Once you have the old concrete garage floor removed, you then need to remove the subsoils that caused the failure in the first place. Generally, if you remove the upper two (2) feet you will be fine. The idea is that what sits below the first two (2) feet has been consolidated from the weight of the soils above it and the garage floor itself. This isn't always the case, but holds true in about 80% of all cases. This means that the remaining soils have been compacted to a degree that they should not cause a future settlement problem.
Next, you will want to bring in clean soils that are free of any decomposable materials such as wood, pulp, and any other de-gradeables. These soils should be placed in 6" lifts and compacted with a power vibrator. Clays other than sugar clay are what you want. You need to bring the new clay up in the 6" lifts leaving height enough for a final 6" lift of crushed rock that will sit directly below the new concrete garage floor slab.
An alternative to the clay and crushed rock scenario is the use of bottom ash as a fill material that is also placed in 6" lifts and compacted with a power vibrator. The bottom ash is coal that comes from any coal-fired process such as an electric power plant. It is unburned coal that falls to the bottom of the furnace and is a bit denser with a higher specific gravity than the coal that burns in the process. It is conveyed out of the bottom of the furnace into piles outside the plant near the smoke stacks. It is generally inexpensive in comparison to clay and crushed rock and in most cases works just as well as a fill material that won't settle or migrate beneath a new concrete slab.
Once you have the subsoils work completed, don't forget to place a vapor barrier over the new fill material prior to placing the new concrete. The vapor barrier should consist of 6 mil. polyethylene and you should tape any joints or overlaps with a vapor proof tape to completely seal off the underside of the slab.
Pouring and Finishing The New Concrete

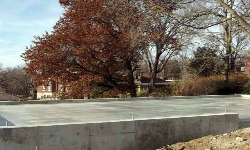
The photo at the left shows a newly poured concrete garage floor (and new concrete foundation) recently placed in Ottumwa, Iowa. It is for a 24' x 36' two car garage. There is a 12' x 24' workspace at the far left end of the photo. There was a lot of Iowa clay used in filling under the slab. Some fills are 6' feet deep under the workspace area. The fills were all placed in 6" lifts and vibrated into place. The final fill was 6" of unwashed crushed limestone (gray) vibrated.
Prior to placing the limestone lift, a floor drain was installed that sits between the two garage door openings. It drains to daylight out the back wall of the garage. After the limestone lift was placed, the vapor barrier was installed and the concrete for the floor was placed. It slopes slightly from all corners towards the floor drain. About 1/8" per foot of slope. The owner wanted it to drain slowly so he could squeegee the water and dirt towards the drain.

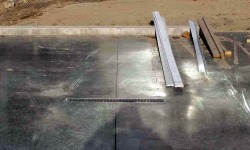
This photo at the left shows a closeup view of the concrete garage floor and the floor drain. The floor was hard finished with a power trowel and immediately thereafter sprayed with a curing compound such as Protex® to slow down the hydration process. Then, after two (2) days the joints were cut in the concrete slab with a power saw. The photo shows the hardness of the slab with reflections of the sky color and light flashes caused by the fine finish of the power trowel process. Once the floor has been washed a few times, the curing compound will come off and any type of permanent finish can be applied, if any.
If you are seeking information concerning garage foundation technology, then visit our page Building A Garage and scroll down to the bottom of the page where the garage foundation links are located. You will find everything you ever wanted to know about garage foundations.
You can successfully execute placing a new concrete garage floor yourself saving thousands of dollars in the process. All you need to do is plan your work and work your plan and you will achieve professional results every time.
❖ Testimonials ❖
We have been following your blog and we have found a lot of useful information in it.
Cecil Sibanda
Product Coordinator
Dorman Products, Inc.
Colmar, PA
I was pleased that I was able to easily find the proper tall storage cabinet for my garage. I needed lockable storage to keep my toddler away from sharp tools and solvents that my husband stores. Garagetips-101 solved my problem!
Renee M.
I love the detail in your garage building pages. They helped me understand how to engineer a foundation for a garage we are planning that our building department will approve. I had the inspector go to your pages and review what I was talking about. Now, I am studying the wall framing sections, as we plan to build it ourselves this fall. Thank you so much for the great information.
R.G.,
Des Moines, IA
Great stuff on wall framing. I never really understood the on-and-off spacing concepts for the wall studs until I read your explanations.
Will,
Grand Island, NE


