"Want Your Garage
Foundation Forming
Done The Way The Pro's Do It?"
Proper garage foundation forming is key to a successfully building a garage and will effect all of your framing work above it. It is imperative that the forms be square, straight-lined, level and plumb, or you will notice every little bit of defect in that work after your pour the concrete and strip away the forms.
Out of level, out of square, and out of plumb forming will effect all of the work you place upon the finished garage foundation so it is best to spend as much time as you need getting it right because the concrete you pour is unforgiving once it has cured.
Let's start with how to build effective garage foundation forms for the Type 1 Foundation that are easy to make into straight lines and will resist the pressure of wet concrete when placed up against them so that the line work remains straight after the concrete is cured and set.
You will need 3/4" thick medium density particle board for the face of the forms and the "Form Sheet Layout Diagram" below shows how you will be cutting your forms from 4' x 8' sheets and one (1) 4' x 9' sheet so that you can get 3 lengths of form from each 4' x 8 sheet and the 4' x 9' sheet will be needed for the extra length required on the end panels so that the forms overlap in the corners and can be tied together on the outside. These criteria are based upon our example which is a 12' x 24' finished garage foundation. Building a garage project that ends up true, plumb, and square, will depend on how well you execute the foundation layout and forming work. Lets look at how it is done!
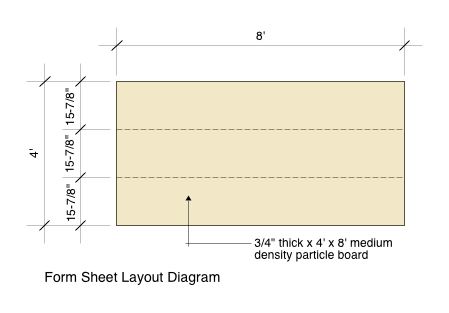
The best approach is to have all of the particle board sheets ready to cut at one time and to set up your table saw fence to rip the pieces to a width of 15 - 7/8" so that you can get three full form lengths from each sheet after the width of the saw blade is figured in.
Next, you will need to reinforce your form perimeter edges with 2 x 2s that will be glued and nailed to the faces of the form lengths. The "Typical Finished Form Length" diagram shown below illustrates how this assembly will look when completed. You should cut the 2 x 2 lengths you will need all at once prior to assembly and also drill your 3/8" diameter bolt holes in the vertical 2 x 2s so that they are all located in the exact same location for alignment purposes when you get ready to bolt your form lengths together.
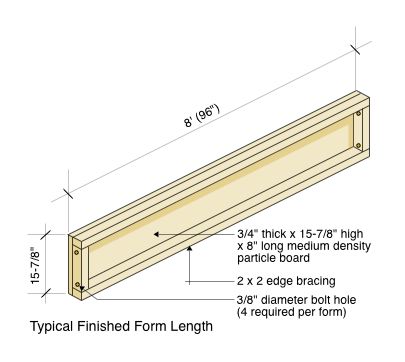
When placing the 2 x 2s onto the form pieces be liberal with the glue. You should use an exterior grade construction adhesive and #10 galvanized nails placed from the foundation side of the form into the 2 x 2s. Let the glue set up about 72 hours before using the forms so that a strong bond occurs between the woods. Strong forms are essential to a superior final garage foundation.
It doesn't matter what type of garage you plan on placing upon your garage foundation. It could be a prefab garage, a kit system of wood or steel, pre-framed panels, or a stick built frame. If you plan on building a garage right, then you can't take enough time and care during the foundation phase.
Now that you have your form lengths built lets look at the "Type 1 Garage Foundation Formwork" diagram below and get those forms into place and ready to secure with 2 x 4 stakes so that you can pour the concrete for your garage foundation.
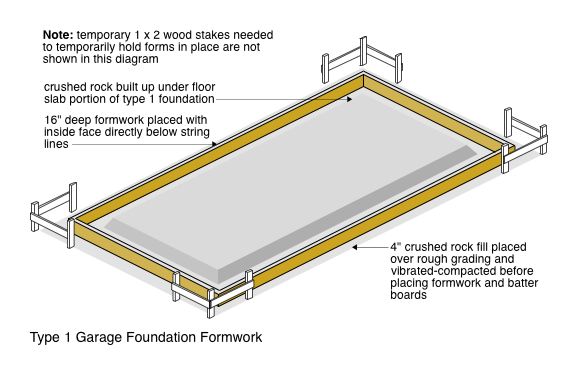
The basic approach is to place the inside face of the forms directly below the string lines attached to your batter boards and use a plumb-bob if needed to get the general alignment in place for all four sides. Then you can lay back your string lines and start bolting your forms together at their joints with 1/4" diameter carriage bolts.
After each side is bolted together you can start leveling your garage foundation forms from one end to the other. Use 1 x 2 stakes on the inside of the form layout to temporarily get everything level and plumb before you check your corners for square. After all four sides are level, you can square up your corners by checking them either with your batter board string lines put back in place, or using the squaring techniques shown on the Foundation Layout page.
Once all four sides are level and square you can place your 2 x 4 stakes (braces) up against the exterior of the forms as shown in the "Type 1 Garage Foundation Form Bracing" diagram below.
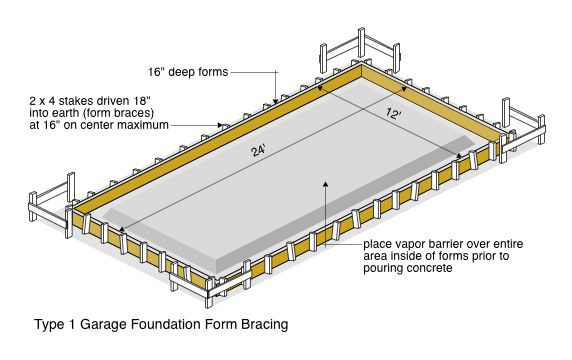
The best approach is to stake both sides of all four corners first. Then take a string line and attach it to one of the long sides just above the inside face of the form and start pounding stakes into the ground along this length as you check for straightness of the form in comparison to the string line.
Move the garage foundation form in and out as you place the stakes to get it as straight as possible and to conform to the string line above it. Then, repeat this same procedure on the remaining long side, and then the short sides. Continue checking for straightness as you place the 2 x 4 stakes into the ground. Also, continually check for level with a four-foot level along the top of the forms as you move around the perimeter (building a garage requires constant leveling and squaring checks as you progress through each phase).
As you pound your 2 x 4 stakes into the ground leave them sit 2" - 3" above the top of the garage foundation forms and be careful to not hit the forms with your sledge-hammer. You can toe-nail the 2 x 4 stakes to the 2 x 2s at the top of the forms as you move around the perimeter to hold everything in place securely.
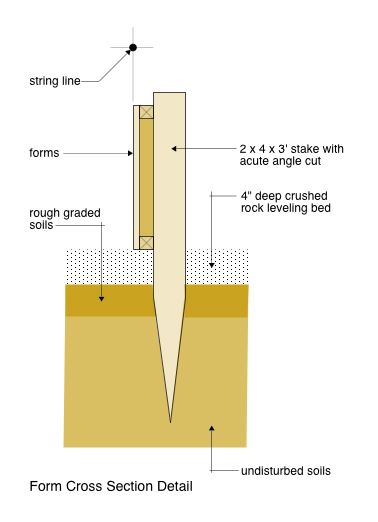
The "Form Cross Section Detail" to the left shows a good example of how the 2 x 4 stakes brace the form work. These should be placed at 16" on center maximum and at any trouble spot where you need to keep the form straight.
After the garage foundation forms are secure you can place your vapor barrier over the entire area inside of the forms and spray form release agent onto the surface of the forms that will mate with the concrete. Some contractors use fuel-oil for this purpose, sprayed on with a hand-pumped yard-weed sprayer. You can also purchase a commercial liquid compound for this purpose at any Big Box Home Store. Since your forms will be new, it is a good idea to do this procedure twice and you need to be liberal with the amount of spray you put on as new forms will absorb some of this into the wood.
Garage Tips: It is a good idea to repeat the application of the form release agent just as the concrete truck is arriving at the site. Also, have all of your reinforcing steel in place inside the forms before ordering the concrete on the day of the pour including any wire-mesh that will be going into the floor area. Make sure you have a sufficient number of anchor bolts ready to insert after you pour and mark their locations with black crayon onto the forms before you pour.
Concrete takes 28 days to reach 60% of it's ultimate strength. The other 40% occurs over many years of hydration. The older concrete is, the harder it gets!
In order to assist a proper cure of your garage foundation, you can cover your concrete with burlap after all finishing details are complete and wet it completely over the entire surface with water. You should do this daily for the first seven days and be liberal with the water. This prevents rapid hydration from wind and sun which will weaken the final product and can lead to spalling on the surface.
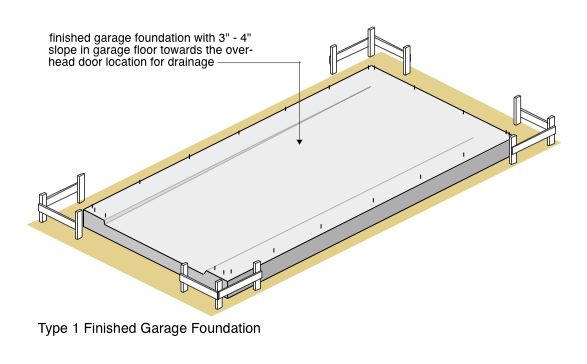
After the first seven days you can remove the burlap and strip away the garage foundation forms. Your finished product should look like the "Type 1 Finished Garage Foundation" diagram shown above. Your anchor bolts should be sitting in place about 2-1/4" maximum above the finished floor surface.
Garage Tips: Placing your anchor bolts in the proper location is very important so that they don't fall directly below a 2 x 4 stud. This takes a bit of planning in advance to know where your starting point will be along each wall. To get a view of what a framed wall looks like, visit our Garage Wall Framing page and study the logical location of the wall studs to get an idea of the starting point at each corner, so that the anchor bolts fall between the studs all the way around the structure.
The Type 2 Foundation Form is far more complicated than the Type 1 or Type 3 Foundation forms for the reason that you have to build a concrete spread footing at the bottom of the trench first, and then set your wall-forms in place on top of the spread footing after you strip the forms from it. You are working in tight spaces, and getting your alignment and squaring accomplished takes much more patience. It is best to set the outer forms first because this is where all of the critical alignment and squaring takes place. Once you have these in place, square, and to the proper dimensions, secure and brace them to the outside wall of the trenches and then start placing your inner forms. These will be much easier to align because you can measure from the outer forms as you go.
Your trenches will need to be a minimum of two feet wide as shown in the diagram below that illustrates the location of the concrete spread footing. It is best to hand-dig half the depth of the concrete spread footing into the freshly trenched ground and then use 2 x 4s to form the upper half of the footing as shown in the diagram. While you are waiting for the concrete spread footing to cure (7 days) so you can remove the 2 x 4 forms and stakes, you can be building your Type 2 Foundation forms to place on top of the footing.
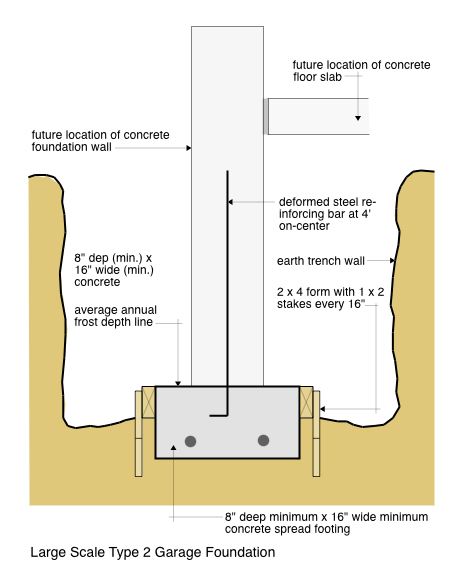
Now lets look at how to build forms for the Type 2 Foundation. These are a bit more complicated than the Type 1 Foundation forms in that they require more structural support so we will be using 2 x 4s for perimeter and internal bracing to help keep the forms from bulging when concrete is placed into them.
The basic foundation forming approach is to determine the depth of your forms first. This will be determined by your local annual average frost depth conditions. The spread footing that the forms sit upon should have it's bottom elevation placed 8" lower than the average annual frost depth. As stated before, this gives you a little extra insurance for those years when the frost penetrates even deeper (building a garage requires a lot of pre-planning for conditions you may have not thought of).
Once you determine this depth, you can start building your forms similar to what is shown in the Type 2 Foundation Form diagram below. It is best to make your forms no more than 4' in length so that you can easily handle them when placing them into the trenches on top of the concrete spread footing.
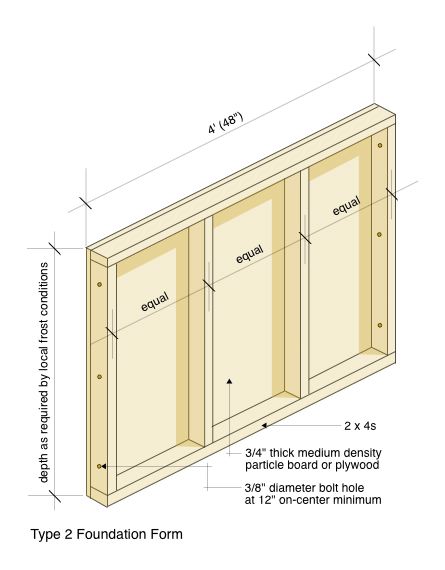
Keep in mind, there will be locations that you have to extend forms to a length greater than 4', and build forms shorter than 4', such as outside and inside corners. Extending forms at outside corners can be accomplished by adding a 2 x 4 on the end of the form so that the adjoining form can be bolted to it. This 2 x 4 would be perpendicular to the 2 x 4 on the form end that you are attaching it to. What is important is that the inside face of a form meets perfectly with the inside face of the form it mates with. As for the inside forms, there will be two corners that will need two (2) forms shorter than 4', assuming you are building either a rectangular or square garage. Make sure you calculate all of this based upon your specific garage plans prior to starting your form building.
Once you have your forms built, you can start placing them into the trench atop the concrete spread footing. In order to brace the forms once they are in place, you will need internal bracing in the form of snap-ties, and external bracing made from 2 x 4s as shown on the diagram below.
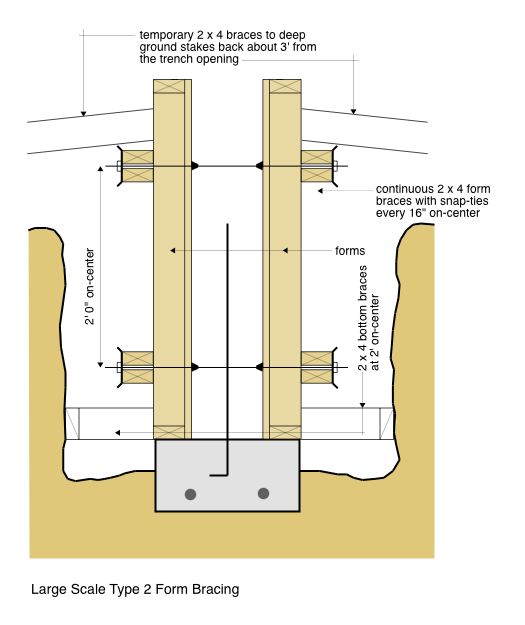
The snap-ties need to be placed at 16" on-center horizontally and they go between the 2 x 4 continuous bracing that attaches to the outside of the forms. The purpose of the snap-ties is to hold the forms together while the concrete is wet. They balance the loads from one form face to the other and also hold the 2 x 4 continuous bracing tight to the face of the forms.
The external 2 x 4 bracing shown in the diagram holds the bottom and top of the forms in place while the concrete is wet. You can't do a sufficient enough job when it comes to this bracing because if it fails, your foundation forming will break apart and you will have a mess in your trench. Take your time when placing these braces and make sure they are very tight and secure. Wet concrete exerts a tremendous load upon the form faces and that load needs to be transferred to the earth. Building a garage requires a lot of patience. If you are new to this, take your time on this stage of the work because once poured, there is no adjusting concrete.
The Type 3 Foundation Form is simply the Type 1 Foundation Form with a more complicated bracing scheme. Since the form sets right at the edge of the trench, it requires a more rigid bracing set-up that ties back to 2 x 4 stakes driven into the undisturbed soils about three or four feet away from the trench edge. The diagram below illustrates how this set-up works. Essentially, you will be pouring a composite floor slab and hybrid stem-wall foundation all in one pour.
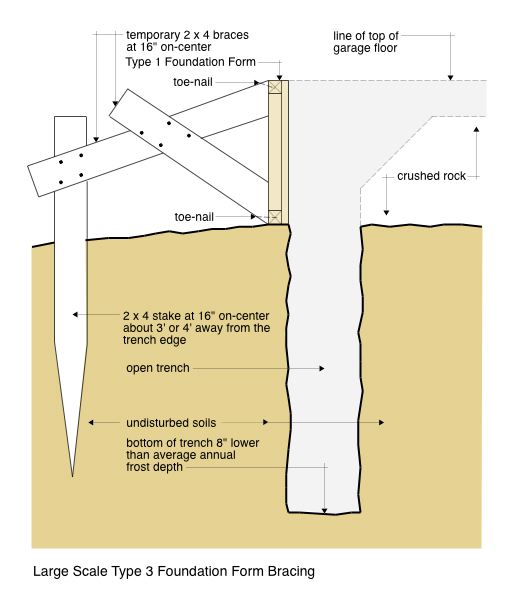
This gets a little tricky because you have to get your crushed rock fill into place under the floor slab without having it fall into the trenches. The best approach for this is to place the crushed rock before you dig the trenches. This gives it a little time to settle and lock-into place. The trenching generally won't disturb this placement. After you have your forms in place and braced, you can lay your vapor barrier over the top of the crushed rock and drape it down into the trench a little ways. At that point, you will be ready to pour your composite structure. Don't forget to place release-agent on the form faces prior to pouring your concrete.
Building a garage can be very rewarding, especially if you are doing all the work yourself. Foundation work can be tricky and forms not sufficiently braced can bring about accidents — so take your time at this stage and get it all right before you order concrete.
❖ Testimonials ❖
We have been following your blog and we have found a lot of useful information in it.
Cecil Sibanda
Product Coordinator
Dorman Products, Inc.
Colmar, PA
I was pleased that I was able to easily find the proper tall storage cabinet for my garage. I needed lockable storage to keep my toddler away from sharp tools and solvents that my husband stores. Garagetips-101 solved my problem!
Renee M.
I love the detail in your garage building pages. They helped me understand how to engineer a foundation for a garage we are planning that our building department will approve. I had the inspector go to your pages and review what I was talking about. Now, I am studying the wall framing sections, as we plan to build it ourselves this fall. Thank you so much for the great information.
R.G.,
Des Moines, IA
Great stuff on wall framing. I never really understood the on-and-off spacing concepts for the wall studs until I read your explanations.
Will,
Grand Island, NE


