"Want To Construct
Garage Wall Framing
The Way True Craftsmen Do?"
Garage wall framing is not as complicated as it may seem. If you follow the simple steps and process we show you below, you will be able to master the process before you know it. All it takes is a little patience and proper planning before you begin so that you can avoid the inevitable boo-boo's that often occur from the willy-nilly approach when building a garage.
Our illustrations and instructional process are based upon a 12' x 24' one-car garage with one man-door and one overhead door. We have broken the thinking-process down into the concept of the Long Garage Wall and the Short Garage Wall. This makes sense since they have to be framed separately for the reason that they meet at a ninety-degree (90°) angle at each outside corner.
We will be framing our garage on a Type 1 Garage Foundation shown on our Garage Foundation page. If you haven't visited there yet, you may find useful information there that you would want to know prior to beginning the framing portion of building a garage. Also, check out our Garage Building Permits page. It holds helpful information about what you will be required to present to obtain a building permit. If you are a newbie to wall framing, visit our Wall Framing Primer page to get familiar with the elementary information.
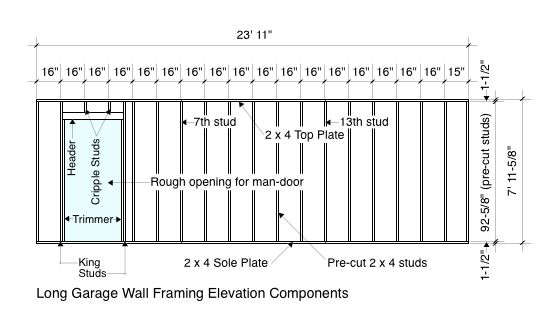
The diagram below shows one of the long garage walls that will be needed. This wall contains the rough opening for the man-door. You can see all of the necessary components of the wall required to assemble (frame) it. Notice that the wall framing dimension is 1" shorter than our overall length of 24'. The reason for this is that we will be placing 1/2" thick plywood or oriented strand board (OSB) structural sheathing all the way around the perimeter, after the roof is framed and sheathed. After the structural sheathing is installed, our finished framing measurements will equal 12' x 24'. Study the components of this diagram and familiarize yourself with how it will be assembled and then we will explain the details of how it must be accomplished.
To assemble the long garage wall framing components we will start with the 2 x 4 sole plate and top plate by laying lengths of 2 x 4 material side by side on the ground or garage floor. We are going to be marking the location of each stud on them simultaneously with a small framing square that is 1-1/2" wide. It is the same width as a 2 x 4 stud for the purpose of easy markings with a pencil.
The trick to this is getting the sole and top plates to break under a stud center because your plate material will not be continuous, as in 24' foot lengths. Most likely, you will be using one 9' length and two 8' lengths on the top and bottom and the 9' length will be the one that we will cut first to land under the center of a stud. Although stud spacing is referred to as being on-center, you will discover that it is really edge-to-edge, as shown in the dimensions of the diagram above.
So if we examine the above diagram, starting on the top left side and reading right, we can see that if we cover the first six (6) stud spaces with a 8' long 2 x 4 we will fall short of meeting the center of the seventh stud by 3/4". So we will cut the 9' - 2 x 4s to a length of 8' 0-3/4" for both the sole and top plates. Next we can place a full 8' - 2 x 4 length next to this without any cutting to length and it will fall under the center of the thirteenth stud in the wall. Finally, we can cut the the next plate length from a 8' long 2 x 4 to the measurement of 7' 10-1/4". We need a total plate length of 23' 11", so lets add up our proposed lengths before we cut to make sure we have it right:
8' 0-3/4" + 8' 0" = 16' 0-3/4" (23' 11" - 16' 0-3/4" = 7' 10-1/4"). Yup, we got it correct!
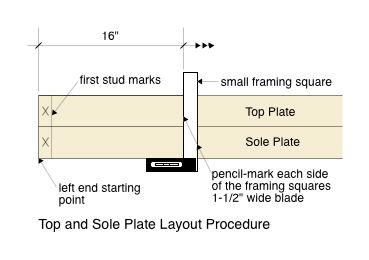
Now, lay all of your plates in order as shown in the diagram at the left with the top plates above the sole plates and use the small framing square to start laying-out the 2 x 4 stud locations. Start at the left side where the first stud will go and align the square with the edge of the plates and mark a 1-1/2" wide space with your pencil and place an "X" in the middle of the mark. That means a full length stud goes there. Now measure over with your tape a full 16" and mark it. Place your square on the plates and draw a line on each side of the 1-1/2" wide blade.
All of your marks along the top plate will be at 16" edge-to-edge except for the trimmers and a king-stud that falls off-spacing due to a rough opening. When you get to those marks on the plate, write inside of the space what goes there just as you will do for cripple-studs that fall on-spacing. Study the Long Garage Wall Framing diagram above and you will get the idea of what falls on-spacing and off-spacing, all of which have to be marked on the top and sole plates. Placing the "X" in the full stud locations will always tell you that there is continuous wood from the top to bottom in that space as you are placing your 2 x 4s between the plates for nailing. The plate markings are sort of like a map that you utilize for garage wall framing when building a garage.
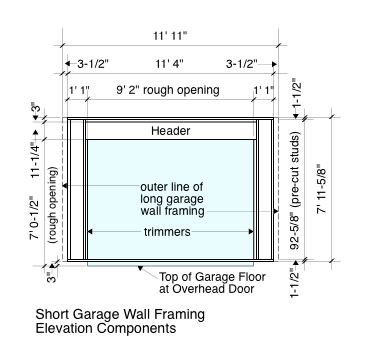
Now lets look at the Short Garage Wall Framing Elevation Components diagram at the right. This is the more complicated of the short walls since it contains the overhead door rough opening. Pay close attention that both short walls will fit between the two long walls which will be erected and braced first. The diagram shows where those long walls will be in relation to the short walls and you have to get your measurements exact on the widths.
Once you have a clear picture of how this will all fit together, you can proceed to construct all of your walls, or build them one at a time, erect each one, brace it, and move on to framing the next wall. Building Codes in the United States and Canada require that you place two (2)-16d nails into each stud where they join the top and sole plates to prevent twisting during heavy-wind loads, so be sure to keep this in mind during your framing process when building a garage.
Before you can erect your garage wall framing, you will have to locate and drill the anchor-bolt holes into the sole plates and place your sill-sealer onto the foundation where the wall will sit. It is best to oversize the anchor-bolt drill holes a bit so you can adjust the wall location in-and-out at the sole plate for straightness. Make the holes 3/8" larger than the bolt size. That will give you 3/16" of an inch all the way around for adjustment purposes.
Garage Tips: It is a good idea to snap-a-line on the foundation with a chalk-string as to where the outer face of the garage wall framing will sit. In the illustration we are using for a 12' x 24' garage, we are holding the walls back 1/2" from the foundations outer edge so that when we place the 1/2" structural sheathing on the walls it will be flush with the face of the foundation allowing the siding to sit down over the foundation face tightly. Keep this in mind when you drill your holes in the sole plates for the anchor-bolts.
Now lets study the Garage Wall Framing Erection and Bracing diagram below to see just how we sequence the erection of each wall and brace it to the earth until we have them all erected, braced, and joined at the corners.
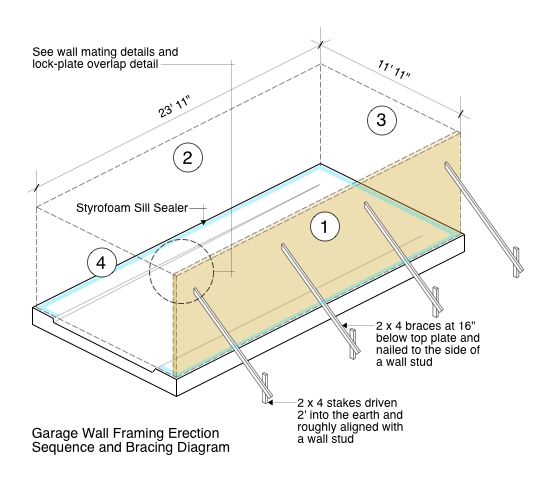
We have numbered the walls as "1", "2", "3" and "4" which is the order that we will erect and brace each wall until we have all four walls up, squared, level, plumb, and ready to lock the washers and nuts down over the anchor-bolts. If your foundation isn't exactly level, you can level the walls by placing shims under the sole plate until you have the wall lifted at the low spots. It is important to get the top plate level for the roof framing phase.
As you place each garage wall framing structure into position, you want to first make sure it is in a straight-line before you secure your bracing. You do this with a string line run along the top plate out from the edge of the plate about 1/2". Simply nail a 1 x 1 x 4" piece of pine to each end stud and run the string to each end. Then move the wall in and out with the interior braces until the wall matches the string line from one end to the other. Once you have it near perfect, nail the braces to the stakes in the earth. You can do this same procedure at the bottom plate with the string and a sledge-hammer to tap the wall in and out before tightening your nuts on the anchor-bolts.
Garage Tips: Just use one nail in the brace where it sits against the stud in the wall so you can pivot the brace up and down until you can nail it at the outer end. Then, when your are satisfied with the alignment, add an extra nail to the brace at the wall stud and the stake in the earth.
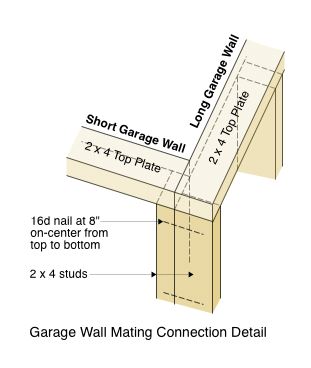
Once you have walls "1" and "2" up, aligned, and braced, you can erect wall "3" and secure it to walls "1" and "2" in accordance with the diagram shown on the left. You do this before adding any bracing, which will only be required at the middle of wall "3" for aligning with the use of the string as described above. Use the same procedure described above for aligning the sole plate and then move on to wall "4". When erecting wall "4" use all the same procedures and run a brace to each side of the rough opening for the overhead door.
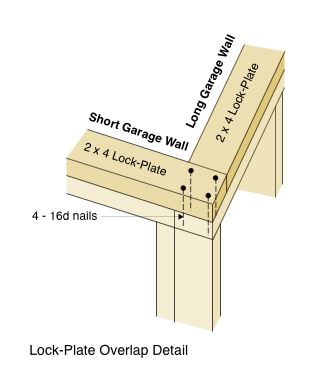
After you have all of your garage wall framing erected, joined at the corners and braced, you can proceed to installing the final top-plate which is called the lock-plate as is shown in the diagram at the left.
This plate overlaps the top-plates on the walls to effect a final cross-linked structural-tie where the ceiling and roof framing will bear.
This procedure is required by all building codes in the United States and Canada and helps the garage wall framing structures resist excess wind-loading by transferring loads between the walls at the ninety-degree turns. Once the structural sheathing is installed over your square, true, and plumb garage wall framing, you will have a building that will not deflect or bow from sustainable wind forces.
Editor's Note: When checking your garage wall framing for plumb, don't try for perfection until you have all four walls up and joined at the corners. Then proceed with your string-line checks along the top plates and final brace each wall as you move around the building. The walls are very flexible at this stage and can be moved back-and-forth, and in-and-out to a great degree, until final securing of the braces. Once you have it right, place the final top plate/lock-plate into position with long lumber lengths that overlap any joints in the top plates below by a minimum of 32" except at each corner, where the overlap will obviously be 3-1/2".
Your final bit of garage wall framing work will be to add interior backing or blocking to accommodate drywall at the inside corners. Look at the diagram below that illustrates how this works.
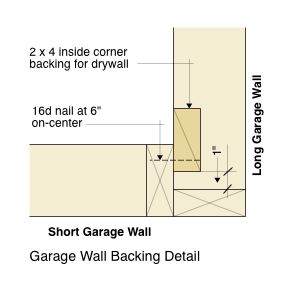
You can do this two different ways. One is to add a full length stud at the corners of the long garage walls when framing them, or you can add 2' long pieces afterward with one at the top, one at the bottom, and one right in the center height of the wall.
Either way will work fine. The nice thing about this design is that if you plan to insulate your garage, you can tuck bat (or blown foam) insulation all the way into the corner to get a more effective insulation value around the entire perimeter of the building.
You should be ready now to move on from garage wall framing to roof framing, so visit our Garage Roof Framing page and study the content. Building a garage can be a very rewarding project. If you follow these instructions step-by-step, you can achieve professional results that are structurally sound as a do-it-yourself owner.

❖ Testimonials ❖
We have been following your blog and we have found a lot of useful information in it.
Cecil Sibanda
Product Coordinator
Dorman Products, Inc.
Colmar, PA
I was pleased that I was able to easily find the proper tall storage cabinet for my garage. I needed lockable storage to keep my toddler away from sharp tools and solvents that my husband stores. Garagetips-101 solved my problem!
Renee M.
I love the detail in your garage building pages. They helped me understand how to engineer a foundation for a garage we are planning that our building department will approve. I had the inspector go to your pages and review what I was talking about. Now, I am studying the wall framing sections, as we plan to build it ourselves this fall. Thank you so much for the great information.
R.G.,
Des Moines, IA
Great stuff on wall framing. I never really understood the on-and-off spacing concepts for the wall studs until I read your explanations.
Will,
Grand Island, NE


