"Want To Layout Stair Stringers
The Way The Pro's Do It?
Then Study This
Stair Stringer Primer!"
This stair stringer primer will teach you how to layout your rise and run for a stair stringer including the special attention you will need to give to the bottom step and the top step. If you haven't read our page: Stair Layout Primer, we highly recommend that you do so before attempting this stage of stairs construction. Also, familiarize yourself with the three (3) main wooden stair types illustrated on our page Stair Types so you have a clear idea of their differences.

In this stair stringer primer we will be laying out the stringers for the Type 2 closed-riser stairs illustrated in Stair Layout Diagram 1 shown on our page: Stair Layout Primer. We will be using a standard 16" x 24" framing square like the one shown at the left, and a pair of brass stair gauges to lock-in the dimensions — once set.
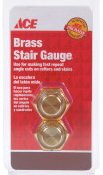
The brass stair gauges shown at the right lock onto each leg of the framing square so that repetitive work on the stair stringers (everything between the bottom and top treads) stays uniform in measurement. You can purchase these at any Ace Hardware Store for a nominal cost if you don't already have a pair.
In this stair stringer primer we will be laying out a pair of stair stringers that have thirteen (13) treads, fourteen (14) risers, and a tread run of 9-3/4" with a riser dimension of 7-7/8" and a 1-1/4" nosing at each tread. We will be working with 2 x 12 stringer material that is 14' in length. Our material will be Southern Yellow Pine so that we can achieve the maximum structural integrity possible in the stringers — after they are cut.
Garage Tips: We suggest that you open our page Stair Layout Primer in a new tab and scroll down to Stair Layout Diagram 1 so that you can toggle between this Stair Stringer Primer page and that page for reference as we progress. Get New Tab Here!
This stair stringer primer will now illustrate how to layout the bottom tread (Tread 1) with our framing square and the dimensions specified above. The diagram below shows our 2 x 12 stair stringer (setting on saw-horses) and our framing square. The framing square is set with the brass stair gauges at 7-7/8" on the 16" leg measured down from the upper outside corner of the framing square. This is the riser dimension we are using.
Our tread dimension of 9-3/4" is also set with the brass stair gauges measured over on the 24" leg from the same outside corner. These dimensional settings establish the needed angle of 38.86° so that our risers will be plumb and our treads will be level. You will have no lumber to waste using the 14' lengths of 2 x 12 material so you have to get right to the end of the stringer with your first pencil-lines. Also, notice the dimension of 6-3/8". This is our 7-7/8" riser dimension minus the thickness of the tread material of Tread 1 which is 1-1/2".
Garage Tips: You will notice when setting up your framing square with the brass stair gauges that due to the fact of the size and shape of the gauges, that they will not align with the measurements you are striving for on the legs of the square. Do not worry about this — the measurements on the legs of the square have to align with the edge of the wood on the stringer. That is all that is important.
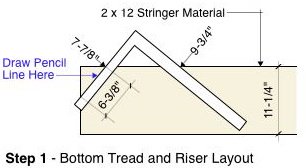
Stair Stringer Primer Step 1: Cut a piece of 1 x 1 to the exact length of 6-3/8". Make sure both ends are square by trimming one off first, then measuring and cutting to length by cutting the opposite end. Move your framing square to near the end of the stringer material and place the 1 x 1 gauge along the outside edge of the 16" leg of the square. When you get to the point that the 1 x 1 gauge is exactly aligned with the stringer line at the top and the end remove the gauge and make a pencil-line along the framing square blade. Slide the framing square out of the way and check the length of the line with your tape measure to make sure it is exactly 6-3/8".
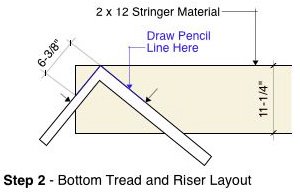
Stair Stringer Primer Step 2: Now, remove the brass stair gauges from your framing square and align the short leg of the square with 6-3/8" pencil-line you drew onto the stringer in Step 1. Get the upper corner of the square right up to the top of the line and draw another pencil line along the 24" leg of the square exactly 9-3/4" long. You can use the ruler along the top of the 24" leg for this. You will now have two (2) pencil-lines on your stringer — the bottom riser and the bottom tread (Tread 1).
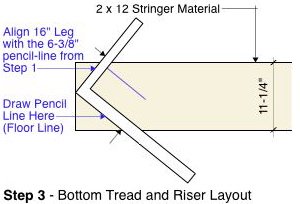
Stair Stringer Primer Step 3: Now you need to establish the floor line where the stringer will meet the lower of the two floors. Remove the brass stair gauges from your framing square and align the short leg with the 6-3/8" line drawn in Step 1. Then, draw a pencil-line along the entire distance of the bottom of the 24" leg of the square. This will establish the lower floor line where the stringer will rest. Once you have this step completed, the remainder of the steps will go fairly quick.
Garage Tips: You now have your first tread (Tread 1), riser, and lower floor line bearing point pencil-lined onto one stringer. It is a good idea at this time to repeat this entire process now onto your second stringer. In this stair stringer primer, we presume that you are a "newbie" to this ancient technology so there are a few added steps being taken for precautionary purposes that a seasoned professional would not execute. These extra steps are for educational purposes to help you understand the procedures more thoroughly.
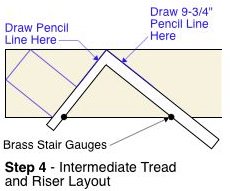
Stair Stringer Primer Step 4: Now, adjust your framing square as shown in the illustration at the left so that the 16" leg aligns with the ends of the tread and floor lines to re-establish your angle. These lines should both be exactly 9-3/4" inches long. Simultaneously align the outside corner of the square with the upper edge of the stringer material and lock your brass stair guides into place as shown on both legs of the framing square. Then, mark the next riser line and tread line as shown in the illustration. Make sure the tread line is exactly 9-3/4" long using the ruler along the top leg of the framing square.
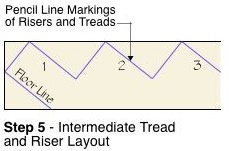
Stair Stringer Primer Step 5: Now continue sliding your framing square along the bottom edge of the stair stringers and pencil-mark each riser and tread as you go with their appropriate number as shown on the illustration at the left. Continue this until you get all the way to Tread 13 and pencil-mark the lines for that tread. The next step will be a little more complicated and will depend upon how you plan to attach your stringers to the next floor. In some cases. carpenters will run a 2 x 6 between the stringers at the top, bolting it to the floor-joist with the stringers end nailed into the 2 x 6. Others will use a more complex approach of cutting the stringer around the floor-joist(s) and anchoring them in from behind. We will illustrate that approach next. Keep in mind that you may need longer lengths of stringer material for the more complex approach.
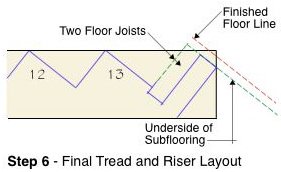
Stair Stringer Primer Step 6: This step is a bit more complicated as you are going to fit your stair stringers up under the backside of the second floor joists for a solid attachment to the second floor. Basically, what you need to do is measure the existing conditions of your stair opening where the stringers attach and scribe those conditions onto the stringers for cutout purposes. Since you will run-out of stringer material you will have to scribe parallel line-work onto the stringers using your framing square without the brass stair guides attached. Make sure all line work is parallel to the tread and riser lines, and you will likely be fine.
Take your time in measuring the existing conditions and make a sketch of what you will be scribing onto the stringers showing your measured dimensions for each turn and meeting point. Where your stringers tuck-up behind the existing floor-joists you can run a 2 x 4 or 2 x 6 between them that will abut the existing floor-joists and then run lag bolts through into the floor-joists to secure the stringers at this end of the staircase. The stringers will have to have the 2 x 4 or 2 x 6 attached to them before the final installation. You should screw each stringer to the end of the 2 x 4 or 2 x 6 with 4" long wood screws. You will have to get an exact measurement of how long the 2 x 4 or 2 x 6 needs to be minus the thickness of the stringers to make this work properly, based upon existing conditions.
You should use the same approach between the stringers at the floor line under Tread 1. Place a 2 x 4 or 2 x 6 between each stringer that can be attached to the first floor. If that floor is concrete, then use concrete anchors to make the attachment. You should also put construction adhesive (PL400) under the 2 x 4 or 2 x 6 before setting the bolts into the concrete anchors.
Garage Tips: One thing we would like to recommend in this stair stringer primer is that before attempting these layouts on expensive structural materials (2 x 12 Southern Yellow Pine), you attempt a dry-run on inexpensive 1 x 12 - #3 Common Pine to make sure you have all of your calculations right and your layout accurate. You can cut the 1 x 12 at each end without cutting-out all of the treads and risers, for a test fit. Once you have it in place in the stairwell, you can check the tread and riser lines to make sure they are level and plumb.
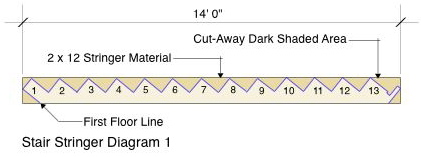
Stair Stringer Diagram 1 above illustrates what your stair stringer layout should look like after you have finished laying out all pencil-lines for the conditions of your project. As you can see, it barely fits onto a 14' long 2 x 12 piece of structural lumber.
Depending upon your own conditions and the rise dimension and number of treads, you will have to decide if you may need to utilize 16" long stringer material. The conditions for your project may dictate this based on how the staircase will be supported.
If you have two adjoining walls along the staircase, you can attach the stringers to the studs with wood screws. In that case, 14' stringer material will probably be more than enough. Also, you can eliminate all of the extra cut-work at Tread 13 and simply pencil-line the back of that tread-riser, downward toward the bottom of the stringer.
As you can see in this Stair Stringer Primer article, this is a somewhat complex subject to deal with. Your editors experience has been that once you grasp the basic concept of how this works with the framing square, the rest becomes easier as you progress with your project.
Next, study our page Staircase Assembly to learn the basics of how to assemble the risers and treads onto the stair stringers.
❖ Testimonials ❖
We have been following your blog and we have found a lot of useful information in it.
Cecil Sibanda
Product Coordinator
Dorman Products, Inc.
Colmar, PA
I was pleased that I was able to easily find the proper tall storage cabinet for my garage. I needed lockable storage to keep my toddler away from sharp tools and solvents that my husband stores. Garagetips-101 solved my problem!
Renee M.
I love the detail in your garage building pages. They helped me understand how to engineer a foundation for a garage we are planning that our building department will approve. I had the inspector go to your pages and review what I was talking about. Now, I am studying the wall framing sections, as we plan to build it ourselves this fall. Thank you so much for the great information.
R.G.,
Des Moines, IA
Great stuff on wall framing. I never really understood the on-and-off spacing concepts for the wall studs until I read your explanations.
Will,
Grand Island, NE


