"Which Stair Types
Will Work For You?"
There are three basic wood stair types in use today that you can build for your garage. They consist of the Open Riser Type 1 Stairs, the Closed Riser Type 2 Stairs, and it's sub-category known as the Wedge and Glue Type 3 Stairs. The Type 3 is the strongest of the three types and also the most labor intensive, but once installed will last a lifetime.
The Type 1 Stairs can be used indoors, and is almost exclusively used outdoors for reaching a Storage or Living area above your garage. We will discuss and illustrate each of these stair types in this article and the various advantages and disadvantages of each so you can make the proper choice for your own project.
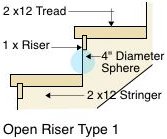
The Open-Riser Type 1 Stairs shown at the left is what the building codes today allow based upon child safety. You have to insert a safety-riser into the stair design under each tread in order to make sure that a small child or infant can not get it's head through the opening between each tread. A 4" diameter sphere (ball) is the test instrument used at inspection time and it has to meet with some resistance as it is rolled into the open area. The premise of this is that an infant large enough to crawl has a minimum head diameter of 4" on average.
The utility of the Open Riser Type 1 Stairs is that for interior use it allows some light into the space behind the stairs. For exterior use, the open riser allows air, snow, leaves, etc. to pass through, eliminating a build-up of debris under the steps. This type is fairly simple to construct once you know the basics of layout and calculation for a given space. We will cover all of that in detail within the articles of this chapter.
The Open Riser Type 1 Stairs is structurally supported by that portion of the reverse-horse stringer that sits below the bottom of the tread line and is perpendicular to a level line (equal with the floor line) that the stringers rest upon. An example of this can be seen in the diagram below.
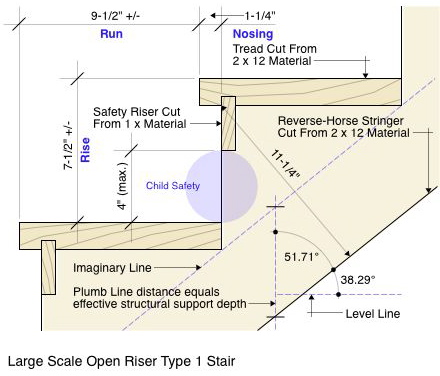
Notice the imaginary line that runs parallel with the line of the reverse-horse stringer and touching the bottom corner of each tread. A plumb line that intersects these two lines is the distance of structural wood-meat that you have to work with to support your stairs. Basically, the steeper your stairs are, the larger this dimensional number will be.
The stairs shown in this example are at a 38.29° angle up from the floor they rest upon. That angle is determined by dividing the run dimension into the rise dimension and then finding the inverse tangent in degrees. You can determine that with your scientific calculator as follows:
Set your calculator screen readings to degrees (DEG). Then, 7.5" ÷ 9.5" = 0.7894 (the ratio). Then, 2nd key followed by tan (tan-1) key = 38.29°. The 2nd key functions like the shift key on your computer and displays the inverse tangent which is the degree of angle that your stringer will sit above the floor line.
The remainder of the wood-meat above the imaginary line is there simply to support and attach your treads to and plays no part in the structural beam that supports the entire stair-works beyond transferring the load on each tread to the beam. However, it is important that it is homogenous with that portion of the stringer that constitutes the structural beam. We will show you how to calculate the stringers for this and to lay them out with a framing square in another article.
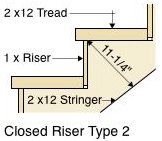
The Closed Riser Type 2 Stairs shown at the left is essentially the same as the Open Riser Type 1 Stairs with the exception that the risers run all the way up and down between the treads. This type is nearly exclusively used for interior purposes and most often between two walls, but not always.
The Type 2 can be free standing from a structural point of view and sit in an open space leading from one floor to the next. Like the Type 1, the Type 2 is a utilitarian stair type intended to carry humans and lighter-weight stored items between floors. The Large Scale Closed Riser Type 2 Stairs diagram below illustrates all of the pertinent construction information for this stair type.
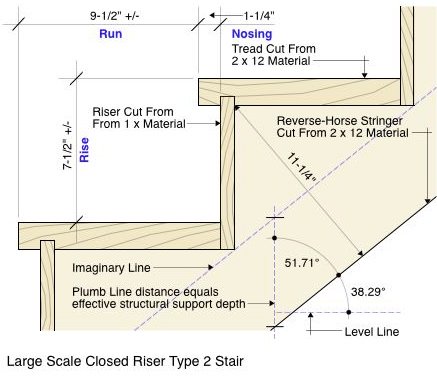
The Type 2 is bit more structurally sound than the Type 1 due to the fact that the risers can be glued and nailed (or screwed) to the tread material forming a diaphragm in folded-plate format from the top through the bottom of the stringers. This form ads a certain degree of rigidity to the entire unit if the treads themselves are also glued and nailed (or screwed) to the stringers.
The treads, risers, and stringers act as one unit under these circumstances and can be of great benefit if the stair unit sits in an open space and has no side-walls. The risers actually become part of the structural beam in that case — if the assembly of gluing and nailing is executed properly. Generally, thess stair types will reduce sway and vibration when in use due to the uni-body concept of design and construction execution.
Editor's Note: We have used the Type 2 Stairs in medium sized Sales and Service Warehouses between the main floor and a overlooking mezzanine floor that has lots of foot-traffic, with great success. The wood fibers tend to absorb noise and vibration in the warehouse area which is mainly steel and concrete that offers little, if any, sound and vibration absorbing properties. The Type 2 stair types should prove ideal for a residential garage or workshop area.
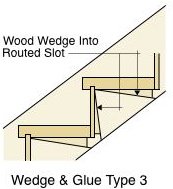
The Wedge and Glue Type 3 Stairs shown at the left is the premium of the stair types from the standpoint of wear, durability, and structural integrity. They are designed to sit between two walls and deliver the stair loads of the tread-riser uni-body to those walls. They will accommodate heavy foot traffic and hand-trucks/dollies carrying maximum loads.
These stair types requires that they be constructed from Southern Yellow Pine (SYP) (Loblolly-Pine) for maximum structural integrity. SYP is a heavy dense wood that grows denser and harder with age, similar to concrete. More labor is required in the layout phase and assembly phase for the Type 3, but the final result is a staircase that will serve you well for the life of the building it sits within. The Large Scale Wedge and Glue Type 3 Stairs diagram below illustrates some of the intricate design detailing of how this type is executed.
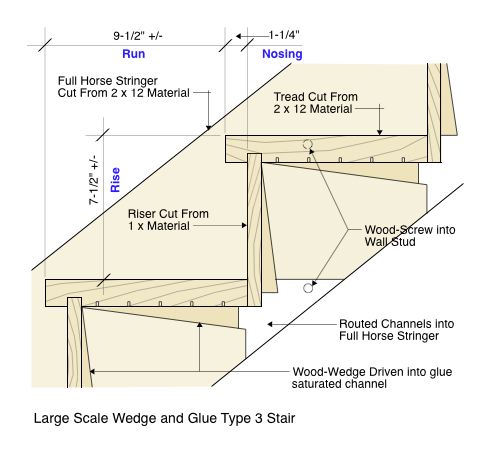
The stringers for the Type 3 stair types remain the full width (11-1/4") of the 2 x 12 material and the treads and risers are routed into them about 1/2" deep using a template that outlines the tread, riser, and the wood-wedge space below them that is out of sight when the stair is finished. The stringers are screwed to the side-walls and then the treads and risers are inserted in a methodical manner starting and the bottom and working your way to the top.
As the assembly proceeds one step at a time, the area below the treads and risers that are routed out for the wood-wedges, are liberally painted with wood-glue and the wedges are driven into the wet-glue. The risers are glued into each tread-bottom as can be seen in the diagram. For maximum control of warping and twisting, each tread has it's grain broken on the underside by saw-kerfing them in a table saw. We will cover the entire process of the Type 3 in a separate article.
Next, read our page Stair Layout Primer to learn how to measure for, calculate, and layout a set of stairs.
❖ Testimonials ❖
We have been following your blog and we have found a lot of useful information in it.
Cecil Sibanda
Product Coordinator
Dorman Products, Inc.
Colmar, PA
I was pleased that I was able to easily find the proper tall storage cabinet for my garage. I needed lockable storage to keep my toddler away from sharp tools and solvents that my husband stores. Garagetips-101 solved my problem!
Renee M.
I love the detail in your garage building pages. They helped me understand how to engineer a foundation for a garage we are planning that our building department will approve. I had the inspector go to your pages and review what I was talking about. Now, I am studying the wall framing sections, as we plan to build it ourselves this fall. Thank you so much for the great information.
R.G.,
Des Moines, IA
Great stuff on wall framing. I never really understood the on-and-off spacing concepts for the wall studs until I read your explanations.
Will,
Grand Island, NE


